Everything You Need to Know About Picking the Right Kitchen Knife

Any good chef or seasoned home cook will tell you that when it comes to kitchen tools, good knives are critical. But even if you’re tying on your apron as an at-home chef for the first time, knowing which knife to use for certain tasks is *just* as important as knowing how to properly cut that organic produce. So chop chop! Get in the know with this comprehensive infographic below!

knife_knowledge.png

1. Chef Knife: With an 8-14 inch blade, this bad boy is the quintessential kitchen knife for day to day duties like dicing, mincing, and julienning. A chef knife is also great for cutting or slicing into meats, which makes this all-purpose tool a handy one to have in your collection.

2. Paring Knife: This blade typically measures between 2-4 inches. It might be tiny, but it’s incredibly useful when it comes to meticulous tasks like skinning fruits, deseeding small peppers, and deveining shrimp. Much like a chef’s knife, the paring knife is designed for all, albeit smaller, purposes.

3. Utility Knife: This blade is another all-purpose option, but with its 6-8 inch blade, it’s smaller and possibly less intimidating than a chef knife. You may not be able to slice into most meats as easily, but fish is a safe bet. This blade is also ideal for cutting up cheese, vegetables, and fruits.

4. Serrated Knife: Every household should have a serrated knife, which is often referred to as a “bread knife.” Thanks to its wavy blade, you can successfully saw through crusty breads, flaky desserts, and even tomatoes, without squashing their plush interiors. If you’ve been using any other knife for such tasks, stop now; go to the store, and buy a serrated knife. You’ll thank us.

5. Santoku Knife: This glorious knife is a Japanese design and is fab for slicing and dicing. Because of it’s multi-purpose functions, it can be used in place of a chef knife. In fact, some folks prefer it because it’s lighter, yet still gets the job done.

6. Boning Knife: This 5-6 inch blade is pretty limited in its duties, but it’s super useful if you perform these duties often. Trimming fat and carving meat from bones doesn’t just require precision, but also a strong blade that is slightly flexible and really sharp.

Chop Chop!

You Finally Bought an Instant Pot! Here Are 10 Tips on How to Use It Properly

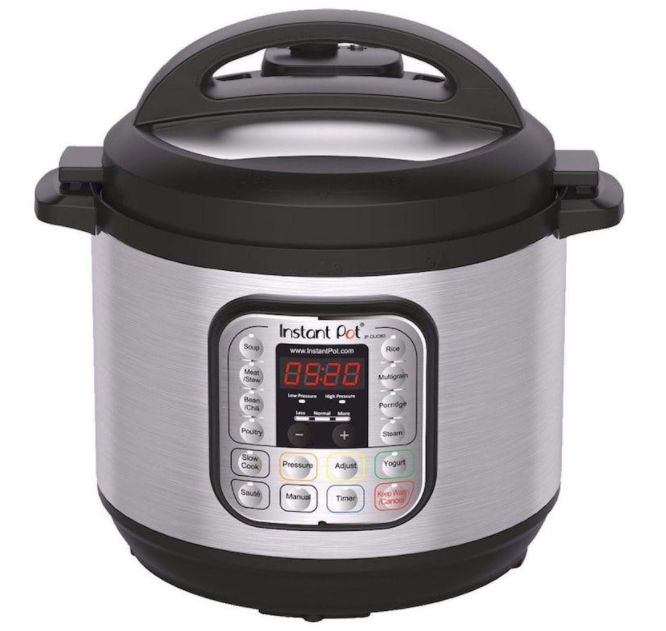
Perhaps your Instant Pot has been sitting in the box for six months, you just brought it home, or you’re seriously thinking about making the investment. It’s different from slow cookers and traditional pressure cookers - it comes with a set of instructions all its own. Settle in, and take a look at the 10 tips you need to know about working your Instant Pot safely and successfully.

instant-pot

1. You’ll rely on pretty much one button. Sure, there’s a poultry button, a rice button, and a multigrain button, but the one you’ll use most often is manual.

2. Don’t ignore the sauté function. Unlike a slow cooker, which cooks food through prolonged indirect heat, the Instant Pot has the ability to sauté and sear ingredients for optimal flavor. If you’re cooking something like skin-on chicken thighs, you’ll start with the sauté function to sear the meat, then add your cooking liquid, lock the lid, and use the manual button to finish out the cooking process.

3. There’s more than one way to relieve pressure. You can release pressure from the Instant Pot in two ways. There’s the natural release method and the quick release method. Once your timer goes off, you can allow it to sit and depressurize naturally, which takes approximately 10-30 minutes depending on your amount of liquid. The more liquid content, the longer it takes. The quick release method is used by manually turning the steam release handle to the “venting” position to let the steam out of the cooker for faster cooling. This method takes about 1-2 minutes to depressurize and you’ll actually see the steam releasing from the vent.

4. You always need liquid. At least one cup, to be exact. Too much liquid will weaken the flavor of your dish, and increase both the pressure release time and the amount of time it takes to get to pressure.

5. Beware of over-filling the Instant Pot. The lines on the inside of the bowl indicate how much the Instant Pot can safely hold when using the sauté function only.

6. Don’t force a locked lid. When the Instant Pot is finished depressurizing, it will automatically unlock to indicate that it’s safe to open. There’s a floating valve on the lid located by the venting knob that will drop when all of the pressure has been released.

7. Your 10-minute recipe may actually take 30. The time indicated on most recipes refers to the time it takes for the dish to cook once the Instant Pot comes to pressure, which could take 10 minutes depending on the liquid content. By the time your Instant Pot comes up to pressure, cooks the food, and then depressurizes, you’re looking at tripling the time the recipe typically says. The good news is that there’s little effort involved, and that dish may normally have taken an hour on the stove.

8. Play with the adjust function. If you want to go back and forth between functions, the adjust button will be your best friend. For example, if you’ve been cooking something on the slow cooking function for several hours and you want to bring it to a boil at the end, press the adjust button whenever you’re ready, and then push the boil button to start that process.

9. Start simple. Don’t unbox your new Instant Pot and then try to make the most complicated thing you can think of. Start with something basic like rice or hard boiled eggs to get your feet wet and get used to the venting process. Then, you can move on to fun things like beef bourguignon.

10. Invest in a few accessories. Your Instant Pot will come with a few basic accessories, but there are all kinds of goodies you can get to make your cooking process more fun and simple. Stackable metal containers will allow you to cook multiple dishes at one time, large steamer baskets accommodate eggs and veggies, and springform pans are great for lasagna and cheesecake.

Happy Cooking!

4 Colorful Fall-Inspired DIYs to Bring the Party This Season

‘Tis the season for entertaining and dinner parties galore. If you’re looking to DIY your way to the title of “hostess with the mostest,” you’ll need to start with our list of fall entertaining projects. With a little elbow grease and plenty of pumpkins, you’ll be ready for your next (or first) party of autumn. So dust off the glue gun, prep the dye, sort through your craft paper collection, and sharpen your scissors — it’s crafting time!

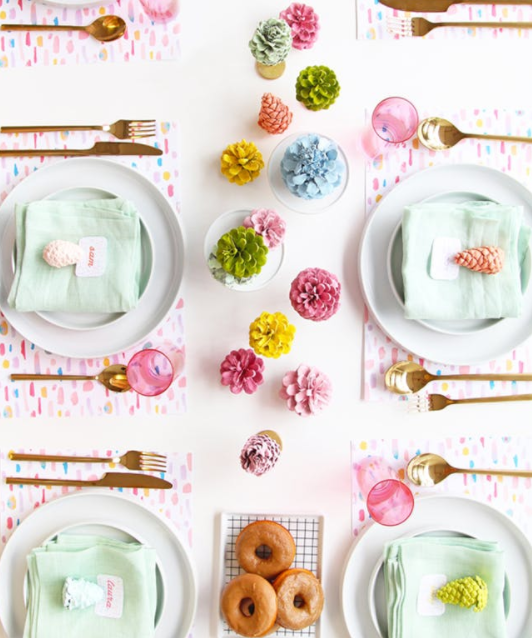
1. Painted Pinecone Table Runner: Pinecones aren’t just for Christmas! You can paint yours and create a monotone or pastel runner. They’ll look just as good around the house as they will on your fall tablescape. (via A Subtle Revelry)

1. Painted Pinecone Table Runner: Pinecones aren’t just for Christmas! You can paint yours and create a monotone or pastel runner. They’ll look just as good around the house as they will on your fall tablescape. (via A Subtle Revelry)

2. Leaf Backdrop: You don’t need a photo booth or dance party setup for this ombre leaf backdrop. Use it as an accent wall in your kitchen or dining room. (via Oh Happy Day)

2. Leaf Backdrop: You don’t need a photo booth or dance party setup for this ombre leaf backdrop. Use it as an accent wall in your kitchen or dining room. (via Oh Happy Day)

3. Gold and Neon No-Carve Pumpkins: These subtle gold and neon-painted pumpkins are a modern and trendy take on the traditional gourd. Put ’em on your sideboard or next to the main dish on your Thanksgiving table. (via For the Makers)

3. Gold and Neon No-Carve Pumpkins: These subtle gold and neon-painted pumpkins are a modern and trendy take on the traditional gourd. Put ’em on your sideboard or next to the main dish on your Thanksgiving table. (via For the Makers)

4. Fall Leaf Cake Topper: These beautiful cake toppers look gorgeous when placed together or individually on cupcakes. (via The House That Lars Built)

4. Fall Leaf Cake Topper: These beautiful cake toppers look gorgeous when placed together or individually on cupcakes. (via The House That Lars Built)

4 Simple Steps to Organizing Your Pantry Like a Pro

Once you’ve purchased the right pots and pans (trust us, you’re going to want to go for cast-iron cookware) and learned how to clean everything in your kitchen, the next step to running your kitchen like a boss is organizing it properly. But we don’t mean simply keeping cereal boxes together on one shelf and baking ingredients on a separate. Similar to how closets went from being places to hold your clothes to super organized spaces "slash" total eye candy, pantries are getting an upgrade. Here are a few of our favorite organization tips and hacks.

1. DITCH THE PACKAGING

Nothing looks quite as gorgeous as a pantry that’s decked out in shiny glass jars containing beautiful nuts, seeds, flours, candies, and everything in between. You’ll have to make an initial investment in some containers, sure, but it’s absolutely worth the effort.

2. BECOME A LABELING WHIZ

Now that you have all those beautiful canisters and jars on display, it’s time to label them. Feel free to get creative here. A super simple black-and-white option will go great with a minimalist kitchen, but if the eclectic look is more your thing, feel free to get patterned and/or colorful.

3. ADD LARGE BINS

Many people reserve their bins and jars for small and bulk items, like flour or popcorn. But we recommend going even further. Large bins can hold snack foods such as chip bags and cookie tins, keeping these admittedly un-cute packages out of the line of sight… Yet also easily accessible.

4. USE WALL DECALS OR WALLPAPER

Use wall decals or wallpaper to make your space POP. You can keep it muted if that’s your jam, or use a bright color or floral design to create a statement. This is your pantry, after all, and it’s not seen terribly often except by you — so this is a fantastic place to take some style risks. You won’t regret it.

Comment

Kenya MURRAY

Executive Recruiter turned Entrepreneur + Small Business Consultant. True Blue #INFJ. Founder @LIKEACELEBNYC Concierge for Modern Business Owners. Motivator. Business Coach. Speaker.

This Fourth of July Chia Pudding Is As Patriotic As It Is Healthy (and VEGAN!)

Every year around 4th of July, everything, from our mani-pedis to our desserts, turns red, white, and blue. But before you reach for the food coloring, how about whipping up an ultra-healthy and naturally patriotic chia pudding? It will satisfy your craving for something sweet, but it’s totally vegan and won’t fill you with empty calories. What’s more, it’s super-simple to prepare, and is the perfect festive treat for your holiday barbecue!

Ingredients:

Makes four

  • 5-6 Tablespoons chia seeds
  • 2 cups coconut yogurt (or Greek yogurt if not vegan)
  • 1/2 cup coconut milk
  • 2 cups fresh raspberries
  • 2 Tablespoons agave syrup
  • 1 cup fresh blueberries

Instructions:

  1. Pour the coconut milk into a large jar and add the chia seeds. Stir to combine and add the yogurt.
  2. Stir very thoroughly, as the chia seeds tend to form clumps, which is a big no-no! You might also want to give the jar a good shake.
  3. Seal the jar and chill in the fridge for a minimum of four hours, preferably overnight.
  4. Place the raspberries and agave syrup in a bowl and mash lightly.
  5. Stir the chilled chia pudding, then add an even layer in little glasses. A jar funnel will help keep things neat!
  6. Add a layer of the raspberries and spoon some more chia pudding over them.
  7. Top with fresh blueberries and serve immediately.

Happy Independence Day!

Eat Healthier & Beat Belly Bloat With These 7 Foods All Year Round!

While we live strictly by the “any body is a bikini body” motto, we understand even the most self-accepting, body-positive ladies among us dread slipping into a bathing suit when we feel bloated. There are a few gut-busting foods we can eat to help keep us feeling our best during swimsuit season. Here are a few tips from Neka Pasquale, Urban Remedy founder and certified Chinese nutritionist. She gives us a closer look at the real causes of bloating, plus seven good-for-you foods that’ll keep it at bay all summer long.

Asparagus: contains the amino acid asparagine, which is a natural diuretic. It releases excess water from the body and clears excess salts as well.

leafy_greens.png

Leafy Greens: Collard greens, spinach, kale, and other deep leafy greens work well to reduce bloating because of their high-water content. They’re also natural diuretics and beneficial to gut health because they provide minerals and vitamins. Check out this recipe for a collard green smoothie!

Seaweed: Pasquale says that ancient Chinese medicine claims, “There is no swelling that is not relieved by seaweed.” It has been used for thousands of years for its diuretic properties. Look for seaweed salads in the cold case of your local gourmet grocer, or head out for a sushi dinner to get your seaweed fill.

Cucumber Juice: Yet again we have a natural diuretic in the mix! Cucumber juice “flushes excess water out of the body via urination. Like a river flowing, it pulls debris on its path, a diuretic flushes toxins and waste via urination, leaving you less bloated and feeling lighter,” Pasquale says. Try subbing cucumber sticks for pita chips the next time you dip into hummus for your 3pm snack.

Fennel: Fresh fennel is tops when it comes to vegetables that support digestion. Bloating, gas, intestinal cramps, and irritable bowels are all good reasons to eat fennel. You can also use the seeds by making a tea or even chewing them after meals.

Ginger Root: Ginger has long been a go-to ingredient in our detox regimens — and is an amazing natural antidote to morning sickness. Ginger “stimulates the digestion and aids in transforming and transporting the fluids in the body.  Phenolic compounds like gingerol are primarily responsible for ginger tea’s positive effect on the digestive system.  Drinking a hot ginger tea just before a big meal or sipping on a small cup of it while eating to reduce bloating and support digestion.

Turmeric Root: From face masks to golden lattes, turmeric is one of our favorite wellness ingredients. It helps brighten skin, reduces inflammation, and even combats fatigue. Pasquale adds that turmeric can also “strengthen digestion, support liver detoxification, and lower inflammation. Turmeric root has been used in Ayurvedic medicine for thousands of years as a sattvic herb, which means it has purifying and balancing properties. As a tridoshic herb, it is tonifying and healing for all body types.” Add turmeric to your tea or a mug of hot water with fresh lemon juice and cayenne pepper in the mornings and see if it stops bloating during the day.

Beyoncé Lyric Drinking Glasses?! Yesssss, Please!

We stumbled on these Beyoncé lyric cocktail glasses that will run your party world. These fierce gems are perfect for your next summer soiree or your bestie’s bachelorette.  If you love this idea as much as we do --- you can buy a 10-pack of the stickers for $13 here.

Collard Green Smoothie?

Happy New Year!

With all the resolutions to be healthier on the brain, we are always looking for ways to incorporate soulful staples into our everyday diets.Thanks to Kevin, one of our amazing Facebook fans, we decided to take our collard greens out of the pot and into the blender. It sounds pretty odd, I know! We love to experiment, so we promised Kevin that we would try it. Below is a recipe that we concocted.

The verdict..We loved it! Thanks Kevin!

INGREDIENTS

2 tablespoons fresh lime juice

2 cups stemmed and chopped collard greens 

1 1/2 cups frozen mango

1 cup chopped pear

3 Fancy Vinaigrettes to Rock Your Salads

There are tons of mouthwatering salads out there, but we all know that what makes or breaks them is the dressing. Sometimes it’s hard to think outside the box on a classic salad topper like vinaigrette, but we’ve discovered that vinaigrette has so much more to offer than just balsamic. We’ve done the world a favor by hunting down 3 of the best vinaigrette recipes out there. So take a break from your go-to french or ranch dressing and discover how delicious (and impressive!) a great vinaigrette can be!


Basil Vinaigrette

If you’ve been searching for a way to put all the fresh basil from your mini herb garden to good use, here’s your solution. Just add a pinch of sugar and spoonful of Dijon and you’re all set. (via Simply Recipes)

Kalamata Olive and Basil Vinaigrette

It’s always a good idea to blend in lots of herbs to create a signature vinaigrette. Fresh basil accents the Kalamata olives wonderfully, and the flecks of purple make for a gorgeous plate of veggies. (via Healthy Seasonal Recipes)

Triple Berry Lime Vinaigrette

When your salad needs that extra layer of sweet, this dressing does the trick. It’s made with all your favorite berries and a splash of lime — we give this one *all* of the gold stars. (via Whats That Smell?)

5 Fall Baby Shower Themes That Go Way Beyond the Pumpkin

So your BFF asked you to plan her fall baby shower and you’re stoked… but also admittedly a little lost about which theme to choose. Before you automatically go down the well-trodden path of planning a pumpkin-themed baby shower, consider these other baby shower ideas that are just as *fall-tastic.*

1. Fox Theme: Here’s to hoping her little one is as cute and clever as a baby fox. Complement the fox-themed decorations with woodland-inspired centerpieces, like this tree stump flower arrangement. (via Marcie Lynn/Style Me Pretty)

2. Where the Wild Things Are Theme: Turn this classic children’s book into a whimsical baby shower complete with gold paper crowns and flower crowns. Get the shower started by asking guests to “crown themselves” upon entering your party space. (via Camille Styles)

3. Shower Theme: Not sure what the baby’s gender is? No problem, just go with a fail-safe shower theme that’s perfect for the coming cold temperatures. You can even add a touch of glitter to the raindrops for some *sparkle.* (via Lisa Storms)

4. Enchanted Forest Theme: For a theme that’s as dreamy as it is wild, go with that of an enchanted forest. Decorate your space with wreaths made of greenery and toy animals. (via 100 Layer Cakelet)

5. Mother-to-Bee Theme: Your BFF is as sweet as honey, which means she deserves the very best, including this adorable honey bee-inspired baby shower. Make sure to send your guests off in the most fall/rustic chic way you know how with a jar of homemade honey. (via Hostess With the Mostess)

credit

This Chocolate Chip Cookie Dough Milkshake Is Nothing Short of Amazing

School is back in session and the last days of summer have come to a close, so it’s time to treat yo’self to a delicious milkshake as a reward for getting back to the grind of a five-day work week. Even though you might be considering cheering to the end of the week with a champagne cocktail, maybe leave the alcohol for another day and opt for a Chocolate Chip Cookie Dough Milkshake instead. Rimmed with cookie dough and topped with cookie crumbles and chocolate chips, this yum-tastic milkshake is a foodie’s dream come true. Treat yo’self by checking out this recipe and creating it yourself — because, friend, you deserve it.

cookie-dough-milk-shake

Ingredients: 

  • 4 cups vanilla bean ice cream
  • 1/4 cup chocolate chips
  • 1 1/2 cup cookie dough
  • 1/2 cup milk
  • 2-4 chocolate chip cookies
  • marshmallow (optional)

Instructions:
1. Take about a 1/2 cup of cookie dough and secure it on the rim of each glass. Place glasses into the freezer so the cookie dough gets solid.
2. In a blender, add abut 3-4 cups of vanilla bean ice cream (depending on consistency).
3. Add about one cup of cookie dough.
4. Throw in a handful of chocolate chips and blend together until completely smooth.
5. Add milk if the mixture is too thick and then blend again.
6. Take the glasses out of the freezer and pour the milkshake into the glasses.
7. Top with a marshmallow, cookie and a fun straw.

Take about a 1/2 cup of cookie dough and secure it on the rim of each glass. Place glasses into the freezer so the cookie dough gets solid. In a blender, add abut 3-4 cups of vanilla bean ice cream (depending on consistency). Add about one cup of cookie dough. Throw in a handful of chocolate chips and blend together until completely smooth.

Red, White & Blue Layered American Flag Cake

You’ve seen it, you’re curious, now make your own! Try this recipe for an American Flag Layer Cake.

Ingredients

Red Cake Layers

1 box Betty Crocker™ SuperMoist™ white cake mix

1 pint (2 cups) strawberries, stems removed, pureed in blender or food processor to about 1 1/4 cups

1/3 cup vegetable oil

3 egg whites

1 teaspoon red paste food color

Blue Cake Layer

1/2 box Betty Crocker™ SuperMoist™ white cake mix (about 1 2/3 cups dry mix)

1/2 cup blueberries, pureed in blender or food processor

3 tablespoons vegetable oil

2 whole eggs

1/2 teaspoon blue paste food color

3 tablespoons Betty Crocker™ white star-shaped candy sprinkles or nonpareils

White Cake Layer

1/2 box Betty Crocker™ SuperMoist™ white cake mix (about 1 2/3 cups dry mix)

1/2 cup water

2 tablespoons vegetable oil

2 egg whites

Frosting and Sprinkles

3 containers Betty Crocker™ Whipped fluffy white frosting (Betty Crocker™ red, white and blue sprinkles, as desired)

Directions

1  To make red cake layers: Heat oven to 350°F. Grease or spray two 8-inch round pans; place 8-inch round piece cooking parchment paper in bottom of each pan. Grease or spray parchment paper. In large bowl, beat red cake layer ingredients with electric mixer on low speed 30 seconds, then on high speed about 2 minutes or until smooth. Spread in pans. Bake 29 to 34 minutes or until top springs back when lightly touched. Cool 10 minutes; run knife around sides of pans to loosen cakes. Gently remove from pans to cooling rack; remove parchment paper. Cool completely, about 30 minutes. Flatten cake layers by trimming off rounded tops. Cut layers in half horizontally to make 4 thin red layers. In 1 layer, cut small round out of center, using 4-inch biscuit cutter. Wrap and freeze 1 thin layer and the layer that was cut out of; save for another use.

2 To make blue cake layer: Heat oven to 350°F. Grease or spray 8-inch round pan; place 8-inch round piece cooking parchment paper in bottom of pan. Grease or spray parchment paper. In medium bowl, beat all blue cake layer ingredients except sprinkles with electric mixer on low speed 30 seconds, then on high speed about 2 minutes or until smooth. Fold sprinkles into batter. Spread in pan. Bake 29 to 34 minutes or until top springs back when lightly touched. Cool 10 minutes; run knife around side of pan to loosen cake. Gently remove from pan to cooling rack; remove parchment paper. Cool completely, about 30 minutes. Flatten cake layer by trimming off rounded top. Do not cut in half horizontally. Cut small round out of center, using 4-inch round biscuit cutter. Wrap and freeze 4-inch round; save for another use.

3 To make white cake layer: Heat oven to 350°F. Grease or spray 8-inch round pan; place 8-inch round piece cooking parchment paper in bottom of pan. Grease or spray parchment paper. In medium bowl, beat white cake layer ingredients with electric mixer on high speed about 2 minutes or until smooth. Spread in pan. Bake 29 to 34 minutes or until top springs back when lightly touched. Cool 10 minutes; run knife around side of pan to loosen cake. Gently remove from pan to cooling rack; remove parchment paper. Cool completely, about 30 minutes. Flatten cake layer by trimming off rounded top. Cut layer in half horizontally to make 2 thin white layers. In 1 layer, cut small round out of center, using 4-inch biscuit cutter. Wrap and freeze the layer that was cut out of; save for another use.

4 To assemble cake: Place 1 red cake layer on cake stand or serving platter; spread 1/3 cup frosting on top. Top with 1 white cake layer; spread 1/3 cup frosting on top. Top with second red cake layer; spread 1/3 cup frosting on top. Gently top with blue layer. Carefully spread thin layer of frosting on cut edge inside of blue cake layer. Gently insert white 4-inch cake round; top with frosting and then red 4-inch cake round; press slightly. Frost side and top of cake using remaining frosting. Top with sprinkles. Store loosely covered in refrigerator.


Originally posted on BettyCrocker.com.